Introduction to Coconut Charcoal for Shisha
For shisha enthusiasts, the quality of the smoke is heavily dependent on the type of charcoal used. While quick-light coals offer convenience, professionals and connoisseurs universally prefer natural coconut charcoal. Made from compressed coconut shells, these coals provide a cleaner, longer-lasting, and odorless burn that does not interfere with the delicate flavors of your shisha tobacco. However, because they lack the chemical accelerants found in quick-light variants, lighting coconut charcoal requires a specific process and the right equipment. In this comprehensive guide, we will walk you through the precise steps to properly light coconut charcoal for an optimal shisha experience.
Why Choose Coconut Charcoal?
Before diving into the lighting process, it is important to understand why coconut charcoal is the gold standard in the shisha community. Unlike traditional wood coals or quick-lights, coconut charcoal is an eco-friendly byproduct of the coconut industry. This means no trees are cut down to produce them.
Furthermore, coconut coals burn significantly hotter and longer than their counterparts. A standard cube can last anywhere from 45 minutes to over an hour, depending on your smoking pace and heat management system. Most importantly, they produce minimal ash and zero chemical off-gassing, ensuring that the flavor of your premium shisha tobacco remains pure and unadulterated.
Essential Tools for Lighting Coconut Charcoal
Because coconut charcoal contains no combustible chemicals, a standard cigarette lighter or matches will not suffice. To light them effectively, you will need a dedicated heat source. Here is a list of the essential tools required for the process:
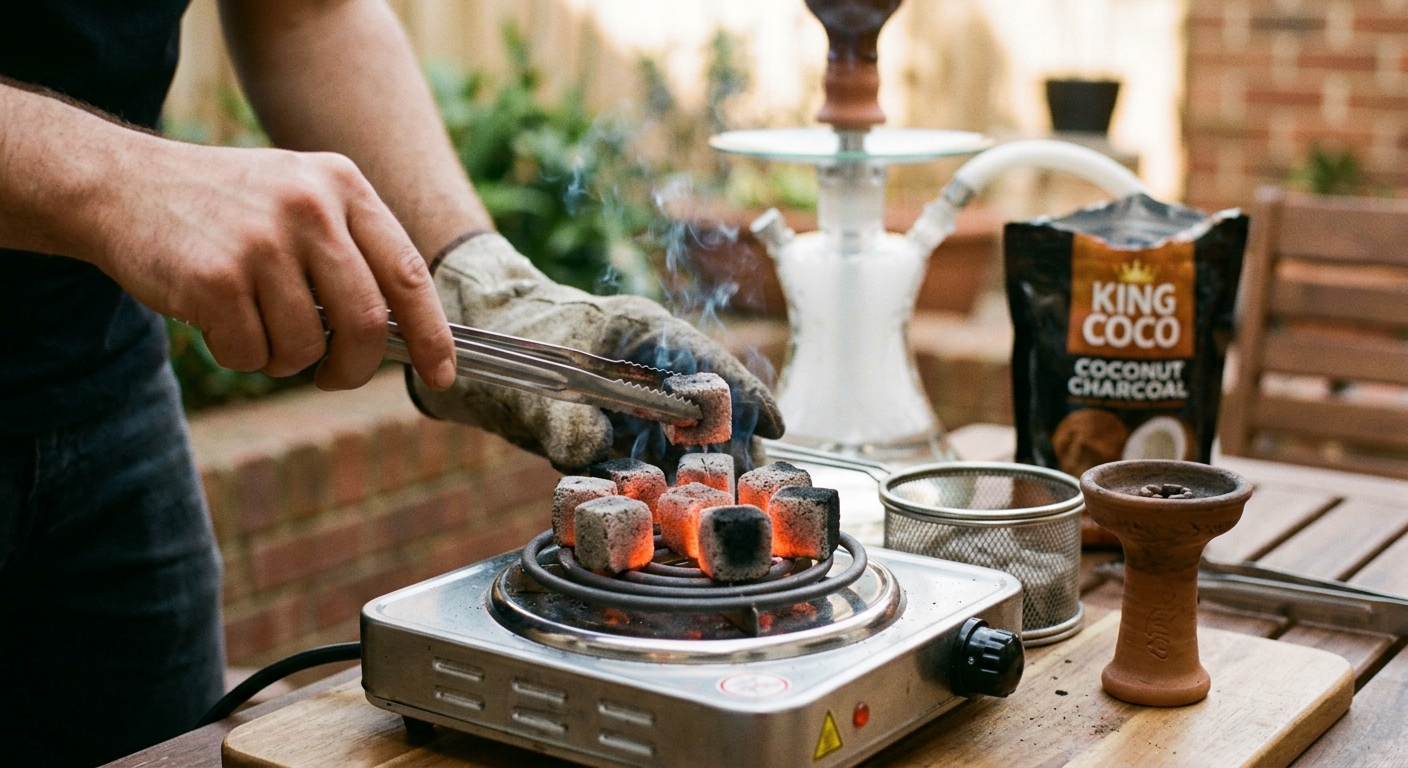
- Electric Coil Burner: This is the most efficient and popular tool for lighting natural coals. A single-coil electric burner reaches the necessary temperatures to ignite the dense coconut shells.
- Metal Tongs: A sturdy pair of long metal tongs is crucial for safely handling and flipping the hot coals.
- Charcoal Carrier (Optional): If you are lighting the coals away from your shisha setup, a safe metal carrier is recommended for transporting the lit coals.
- Well-Ventilated Area: Even though coconut coals are natural, the initial lighting process will consume oxygen and can produce a small amount of carbon monoxide. Always light your coals in a well-ventilated space.
Step-by-Step Guide to Lighting Coconut Charcoal
Following a systematic approach will ensure your coals are lit evenly and thoroughly, preventing black spots that can ruin your shisha session by going out prematurely or producing unwanted carbon monoxide.
Step 1: Preparation and Safety
Begin by setting up your electric coil burner on a flat, stable, and heat-resistant surface. Ensure the area is clear of any flammable materials. Plug in the burner and turn it to the highest setting. It is imperative to perform this task in an area with adequate airflow, such as near an open window or under an exhaust hood, to disperse any initial odors or gases.
Step 2: Placing the Coals
Using your metal tongs, carefully place the desired number of coconut charcoal cubes directly onto the heating coils. For a standard shisha bowl, two to three cubes are typically sufficient. Arrange them so that they are sitting flat against the metal coils, maximizing the surface area contact for efficient heat transfer.
Step 3: The First Heating Phase
Leave the coals on the burner undisturbed for about 4 to 6 minutes. You will begin to see the bottom half of the coals turning glowing red and developing a fine layer of gray ash. It is crucial not to rush this process. Patience is key to ensuring the core of the charcoal reaches the appropriate temperature.
Step 4: Flipping the Coals
Once the bottom halves of the coals are glowing orange-red, use your tongs to carefully flip each cube over so that the unlit, black top side is now touching the heating coil. This ensures an even burn throughout the entire cube. Leave them on this side for an additional 3 to 5 minutes.
Step 5: Verifying Readiness
Your coconut charcoal is ready for use when all sides of the cubes are glowing red and are covered entirely by a thin layer of white or light gray ash. There should be absolutely no black, unlit spots remaining. If you notice any dark patches, leave the coals on the burner for another minute or two, rotating them as necessary to expose the dark areas to the heat.
Common Mistakes to Avoid
Even seasoned shisha smokers can sometimes make errors when preparing their coals. Here are a few common pitfalls to avoid:
- Using a Glass Top Stove: Never use a glass-ceramic cooktop to light natural charcoal. The intense, localized heat can easily crack or shatter the glass, causing severe damage to your appliance and posing a safety hazard.
- Incomplete Lighting: Placing partially lit coals (with black spots) on your shisha bowl will result in an unpleasant, harsh taste and can cause headaches due to incomplete combustion and excess carbon monoxide.
- Over-ashing: While a thin layer of ash indicates the coal is ready, leaving the coals on the burner for too long will cause them to shrink significantly and lose their heat potential before you even begin smoking.
- Ignoring Ventilation: Lighting coals in an enclosed space without a window or fan can lead to poor indoor air quality and discomfort. Always prioritize proper airflow.
Comparing Charcoal Types
To further illustrate the benefits of taking the time to properly light coconut coals, consider the following comparison between natural coconut charcoal and quick-light charcoal.
| Feature | Coconut Charcoal | Quick-Light Charcoal |
|---|---|---|
| Ignition Time | 8 - 12 Minutes | 1 - 2 Minutes |
| Heat Source Needed | Electric Coil Burner or Gas Stove | Standard Lighter or Match |
| Burn Time | 45 - 90 Minutes | 20 - 30 Minutes |
| Flavor Interference | None (Odorless and Tasteless) | High (Chemical accelerant taste) |
| Ash Production | Very Low | High |
| Chemical Additives | None (100% Natural) | Contains Gunpowder/Benzene |
Conclusion
Mastering the art of lighting coconut charcoal is an essential skill for anyone looking to elevate their shisha experience. While it requires a bit more time and specialized equipment compared to quick-light alternatives, the payoff in flavor purity, session longevity, and overall quality is undeniable. By investing in an electric coil burner, practicing patience, and following the safety guidelines outlined in this guide, you can ensure perfectly lit coals every time. Enjoy your premium shisha the way it was meant to be experienced—with clean, consistent, and long-lasting heat.
Frequently Asked Questions
Can I light coconut charcoal with a standard lighter?
No, a standard cigarette lighter or matches do not produce enough sustained, high-temperature heat to ignite natural coconut charcoal. Because these coals lack chemical accelerants, they require a constant heat source like an electric coil burner or a gas stove for 8 to 12 minutes to fully ignite.
How do I know when my coconut charcoal is fully lit?
Coconut charcoal is fully lit and ready to be placed on your shisha bowl when it is glowing red on all sides and covered completely in a thin layer of light gray ash. There should be no black, unlit spots remaining, as partially lit coals can cause a bad taste and emit carbon monoxide.
Is it safe to light coconut charcoal on a kitchen stove?
It depends on the type of stove. It is strictly advised never to light coconut charcoal on a flat glass or ceramic stovetop, as the intense heat can shatter the glass. However, if you have a gas stove with metal grates or an older electric coil stove, you can use them safely, provided you have excellent ventilation in the kitchen.
Why do I get a headache after smoking shisha with natural coals?
Headaches are most commonly caused by using coals that are not fully lit. When coconut charcoal still has black spots, it has not reached complete combustion and releases higher levels of carbon monoxide. Always ensure your coals are fully glowing and ashed over before smoking, and smoke in a well-ventilated room.
How long do coconut coals last during a smoking session?
Depending on the brand, the size of the cubes, and your heat management setup, properly lit coconut charcoal typically lasts between 45 minutes to an hour and a half. Using a heat management device (HMD) or a wind cover can help extend the life of the coals by regulating airflow and retaining heat.
Comments
Post a Comment